使用 Automatiko 将工作流作为函数流 
发布时间:2021-12-17 , 修订时间:2024-01-17
使用 Automatiko 将工作流作为函数流
作者:Maciej Swiderski,OpenEnterprise 软件工程师
各种组织开始将无服务器视为构建业务逻辑的一种方式,这种业务逻辑可以利用云的优势。正如乍一看,它不是一个容易的任务,完全依赖于代表独立逻辑部分的函数。存在失去全局视野的风险,因此无法完全控制日常运营。
在考虑无服务器、函数和事件时,Knative 提供了一个很好的基础。Knative 事件特别出色,因为它集成了 CloudEvents 和各种代理实现,这些实现从事件交付的角度提供不同的特性。
同时,各种格式的工作流被视为表达业务逻辑的一种好方法,这使得能够了解全局视野。将工作流和 Knative 事件相结合是本文的主要主题。
工作流作为函数流
工作流起源于面向服务的体系结构 (SOA) 时代,当时引入了 BPEL 和 BPMN 等标准。各种供应商开始构建以工作流概念为核心的平台,通常称为流程管理套件或业务流程管理 (BPM)。
这些平台通常是大型的集中式服务器,旨在以标准化方式协调所有其他系统。事实证明,这过于复杂,无法带来价值,并且在许多情况下被称为传统 BPM,它已经过时,尽管它们今天仍在使用。
较新的方法使工作流完全分布式,因此工作流的每个活动都作为独立的容器运行。
这将我们带到了工作流作为函数流的概念,该概念允许用户尽可能完整地建模业务逻辑。用户可以从头到尾定义业务用例,并利用 Knative 等无服务器平台的功能。这意味着在运行时,工作流逻辑将作为一组函数执行,这些函数是
- **自包含的** - 专注于业务逻辑的“一个”方面
- **独立的** - 它们依赖于给定的数据来执行定义的逻辑并返回输出,无论它们是处理同一个实例还是不同的实例
- **可随时调用** - 可随时调用,这意味着它们不必始终从工作流的开头开始,因为它们只是根据相关属性(CloudEvent 类型属性)对传入事件做出反应
- **可扩展的** - 由于函数可以轻松地扩展和缩减以适应需求
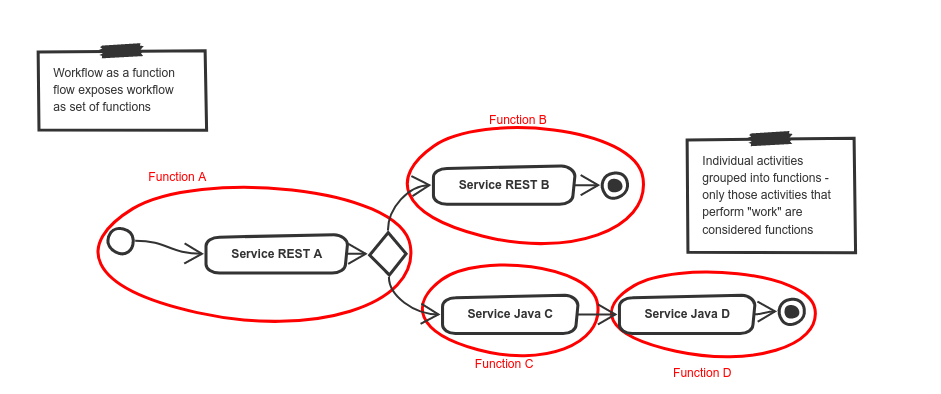 工作流作为函数流
Automatiko 项目提供了这些概念的实现,这些概念利用 Knative 事件、CloudEvents 和工作流定义,以提供构建服务作为完整业务用例的方法,但将其作为由工作流定义控制但由已发布事件调用的函数流执行。
Automatiko 支持以下类型的工作流
将工作流切分成函数
函数是基于执行可以更改工作流状态和数据的活动构建的。这些活动将代表业务逻辑的特定片段,这些片段将被封装为函数。
执行活动可以
- 是单个活动
- 包括其他活动以控制逻辑
- 与其他执行活动组合以形成延续
函数根据工作流或活动名称自动命名,或者由用户使用自定义属性显式命名。
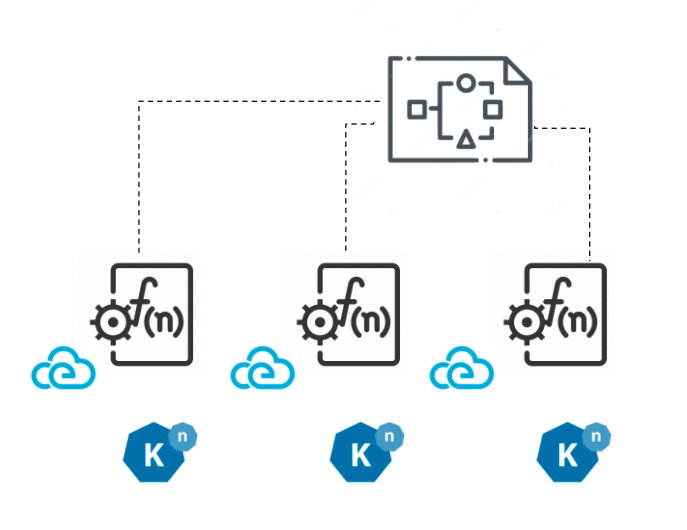
然后,每个函数都成为一个专用的入口点,它
- 具有基于工作流数据构建的输入
- 可以生成一个或多个输出
- 具有与函数关联的 Knative 触发器
 将工作流切分成函数
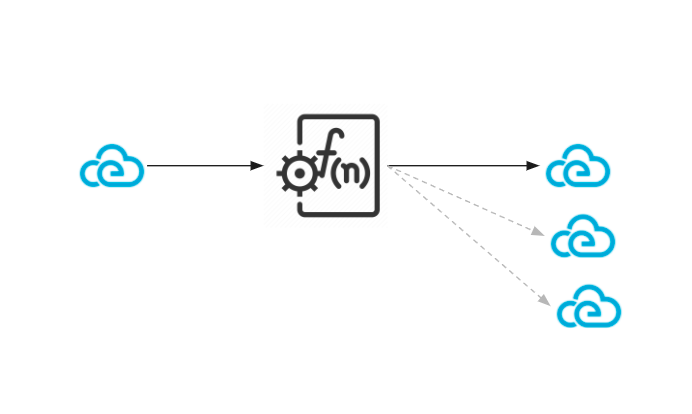
输入和输出作为 CloudEvents
在从工作流中派生出函数后,它们始终将有一个事件作为输入,并且可以生成一个或多个事件作为输出。工作流中定义的逻辑和特定工作流实例的实际数据上下文决定了生成的事件数量。
无论事件是输入还是输出
- 它都是基于工作流中定义的数据对象构建的
- 它根据执行上下文自动填充
- 它使用**类型**属性作为函数的链接
- 它使用**源**属性作为正在执行的函数的标识符,包括工作流实例的唯一标识符,用于相关性目的
 输入和输出作为事件
函数始终通过 Knative 事件代理交换事件。它们从不直接相互调用,这确保它们完全解耦并且是事件驱动的。这允许更高的可扩展性,因为每个函数调用都可以由服务的另一个副本处理。
部署
需要解析工作流定义、将工作流切分成函数和事件以及将其打包到可部署单元中的繁重工作是在构建时完成的。
Automatiko 项目实现了这个概念。它是一个基于 Java 的实现,它利用了GraalVM 来编译成原生可执行文件,该可执行文件在运行时具有较小的内存占用量,并且启动速度极快。
使用 Automatiko 将工作流编译为函数流,可以将其编译成单个服务,并由此编译成单个容器镜像,其中包含所有函数。每个函数都可以在任何时候在服务的任何副本上被调用。
同时,在构建过程中,会生成一个 Knative 清单文件,以便轻松部署到集群。Knative 清单文件包含以下内容:
- 一个 Knative 服务服务
- 一个接收器绑定,用于注入代理位置
- 每个从工作流创建的函数的触发器
这作为直接在构建后拥有完全可运行服务的起点。可以对其进行进一步修改,以适应集群中 Knative 的特定配置。
用户注册示例
此示例展示了一个简单的用户注册,它执行各种检查并在 Swagger PetStore 服务中注册用户。
您可以在Automatiko 文档中找到有关此示例的更多信息。
此示例有两种风格,具体取决于用于创建工作流定义的 DSL。
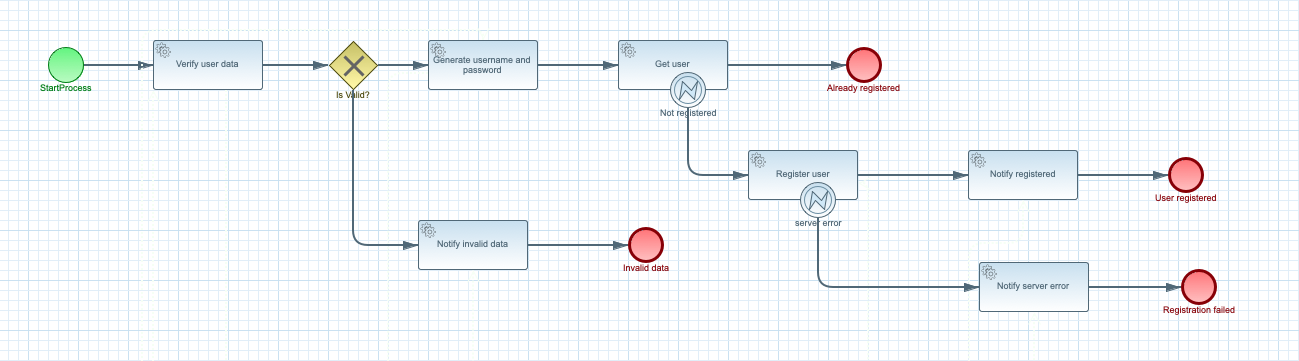 BPMN
BPMN
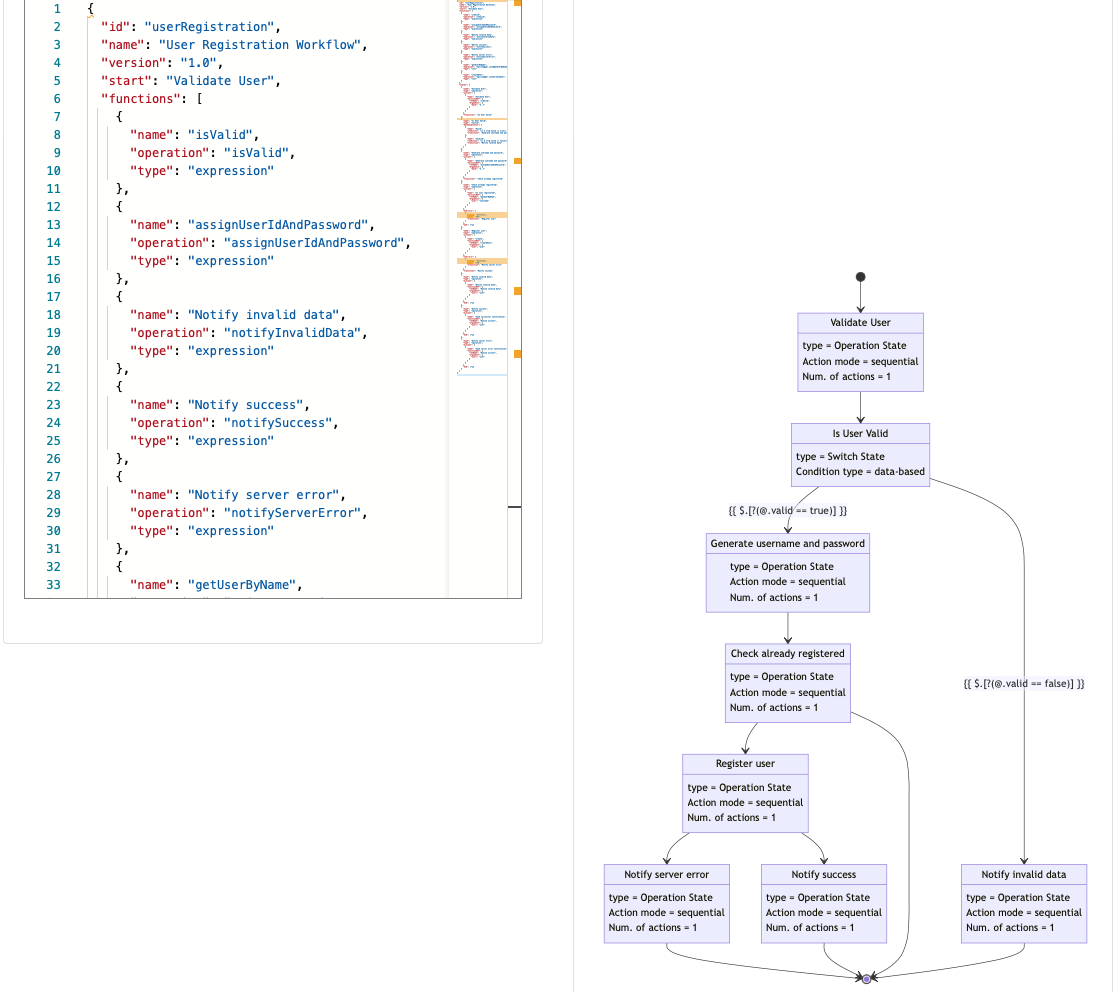 无服务器工作流规范
要自己试用此示例,请克隆此示例项目的两种风格之一
克隆项目后,通过在克隆的存储库中运行以下命令来构建应用程序
mvn clean package -Pcontainer-native
此命令使用 GraalVM 构建的原生可执行文件构建一个包含服务的容器。构建过程可能需要一段时间。
将构建的容器推送到注册表
构建容器镜像后,将其推送到 Knative 集群可以从中拉取的外部注册表。
部署到 Knative 集群
-
创建一个 Knative 事件代理,例如使用以下命令
kubectl apply -f - << EOF
apiVersion: eventing.knative.dev/v1
kind: broker
metadata:
 name: default
 namespace: knative-eventing
EOF
完整的部署文件是在构建过程中生成的,可以在
target/functions/user-registration-{version}.yaml中找到。要部署它,请执行以下命令kubectl apply -f target/functions/user-registration-{version}.yaml这将预配完整的服务和所有 Knative 事件触发器。此外,它还将创建接收器绑定,以使服务成为事件源,以便能够从函数执行中发布事件。
-
可以选择部署
cloudevents-player,它将使用以下命令显示流经代理的所有事件kubectl apply -n knative-eventing -f - << EOF apiVersion: serving.knative.dev/v1 kind: Service metadata: name: cloudevents-player spec: template: metadata: annotations: autoscaling.knative.dev/minScale: "1" spec: containers: - image: quay.io/ruben/cloudevents-player:latest env: - name: PLAYER_MODE value: KNATIVE - name: PLAYER_BROKER value: default --- apiVersion: eventing.knative.dev/v1 kind: Trigger metadata: name: cloudevents-player annotations: knative-eventing-injection: enabled spec: broker: default subscriber: ref: apiVersion: serving.knative.dev/v1 kind: Service name: cloudevents-player EOF -
使用以下命令获取默认代理的 URL
kubectl get broker default -
向代理发送请求以启动用户注册
curl -v "http://broker-ingress.knative-eventing.svc.cluster.local/knative-eventing/default" \
-X POST \
-H "Ce-Id: 1234" \
-H "Ce-Specversion: 1.0" \
-H "Ce-Type: io.automatiko.examples.userRegistration" \
-H "Ce-Source: curl" \
-H "Content-Type: application/json" \
-d '{"user" : {"email" : "mike.strong@email.com",  "firstName" : "mike",  "lastName" : "strong"}}'
这将通过交换的事件数量来完成,这些事件通过 Knative 代理进行交换,并调用在工作流中定义的函数。它还使用 Swagger PetStore REST API,因此如果用户注册成功,它将在 Swagger PetStore 中显示为新用户。
注意
Swagger PetStore 没有可靠的存储,因此可能需要发出几次获取请求才能在那里看到它。
清理
要进行清理,请执行以下命令
kubectl delete -f target/functions/user-registration-1.0.0.yaml
将服务构建为 Google Cloud Run 的容器镜像
为了能够将同一个服务用于 Google Cloud Run,还需要执行两个额外的步骤
-
将依赖项添加到
pom.xml<dependency> <groupId>io.automatiko.extras</groupId> <artifactId>automatiko-gcp-pubsub-sink</artifactId> </dependency> -
将两个属性添加到
src/main/resources/application.properties文件quarkus.automatiko.target-deployment=gcp-pubsub quarkus.google.cloud.project-id=CHANGE_ME注意
请记住将
CHANGE_ME更改为您的 Google Cloud 项目的实际项目 ID -
使用以下 Maven 命令构建应用程序
mvnw clean package -Pcontainer-native此命令使用 GraalVM 构建的原生可执行文件构建一个包含服务的容器。构建过程可能需要一段时间。
将构建的容器推送到 Google Cloud 容器注册表
构建容器镜像后,将其推送到 Google Cloud Run 可以从中拉取的 Google Cloud 容器注册表。
使用 PubSub 部署到 Google Cloud Run
构建和推送完成后,完整的脚本会在构建过程中生成,可以在 target/scripts 中找到。要部署它,请登录到 Google Cloud Console(或使用安装了 gcloud 的终端),在那里可以使用 gcloud 工具,并从 deploy-user-registration-gcp-cloudrun-{version}.txt 中发出所有命令
脚本内容将类似于以下内容
gcloud pubsub topics create io.automatiko.examples.userRegistration.registrationfailed --project=CHANGE_ME
gcloud pubsub topics create io.automatiko.examples.userRegistration.notifyservererror --project=CHANGE_ME
gcloud pubsub topics create io.automatiko.examples.userRegistration.userregistered --project=CHANGE_ME
gcloud pubsub topics create io.automatiko.examples.userRegistration.notifyregistered --project=CHANGE_ME
gcloud pubsub topics create io.automatiko.examples.userRegistration.registeruser --project=CHANGE_ME
gcloud pubsub topics create io.automatiko.examples.userRegistration.invaliddata --project=CHANGE_ME
gcloud pubsub topics create io.automatiko.examples.userRegistration.generateusernameandpassword --project=CHANGE_ME
gcloud pubsub topics create io.automatiko.examples.userRegistration.alreadyregistered --project=CHANGE_ME
gcloud pubsub topics create io.automatiko.examples.userRegistration.getuser --project=CHANGE_ME
gcloud pubsub topics create io.automatiko.examples.userRegistration --project=CHANGE_ME

gcloud eventarc triggers create notifyservererror --event-filters="type=google.cloud.pubsub.topic.v1.messagePublished" --destination-run-service=user-registration-gcp-cloudrun --destination-run-path=/ --transport-topic=io.automatiko.examples.userRegistration.notifyservererror --location=us-central1
gcloud eventarc triggers create notifyregistered --event-filters="type=google.cloud.pubsub.topic.v1.messagePublished" --destination-run-service=user-registration-gcp-cloudrun --destination-run-path=/ --transport-topic=io.automatiko.examples.userRegistration.notifyregistered --location=us-central1
gcloud eventarc triggers create registeruser --event-filters="type=google.cloud.pubsub.topic.v1.messagePublished" --destination-run-service=user-registration-gcp-cloudrun --destination-run-path=/ --transport-topic=io.automatiko.examples.userRegistration.registeruser --location=us-central1
gcloud eventarc triggers create generateusernameandpassword --event-filters="type=google.cloud.pubsub.topic.v1.messagePublished" --destination-run-service=user-registration-gcp-cloudrun --destination-run-path=/ --transport-topic=io.automatiko.examples.userRegistration.generateusernameandpassword --location=us-central1
gcloud eventarc triggers create getuser --event-filters="type=google.cloud.pubsub.topic.v1.messagePublished" --destination-run-service=user-registration-gcp-cloudrun --destination-run-path=/ --transport-topic=io.automatiko.examples.userRegistration.getuser --location=us-central1
gcloud eventarc triggers create userregistration --event-filters="type=google.cloud.pubsub.topic.v1.messagePublished" --destination-run-service=user-registration-gcp-cloudrun --destination-run-path=/ --transport-topic=io.automatiko.examples.userRegistration --location=us-central1

gcloud run deploy user-registration-gcp-cloudrun --platform=managed --image=gcr.io/CHANGE_ME/user/user-registration-gcp-cloudrun:1.0.0 --region=us-central1
注意
CHANGE_ME 将被替换为在构建期间配置在 src/main/resources/application.properties 中的 Google Cloud 项目 ID。
这将预配所有必需的组件,例如:
- PubSub 主题
- Eventarc 触发器
- 服务部署
在 Google Cloud Run 上运行服务
部署服务后,您可以发布第一条消息。例如,使用 Google Console 和以下 io.automatiko.examples.userRegistration 主题
{"user" : {"email" : "mike.strong@email.com", "firstName" : "mike", "lastName" : "strong"}}
这将通过交换的事件数量来完成,这些事件通过 Google Cloud PubSub 主题进行交换,并调用在工作流中定义的函数。
总结
工作流作为函数流实现了无服务器使用的常见场景,其中单个函数构建一个完整的业务案例。它允许您使用工作流来设计完整的业务逻辑,然后将其切分成函数,并基于工作流定义中实际定义的逻辑将其组合成函数流。然而,每个函数都可以随时被调用,使工作流充当一个蓝图,可以从任何地方开始,并根据定义的函数流继续执行。
工作流作为函数流利用了 Knative 事件代理作为通信的支柱,以实现
- 可扩展性,因为每个函数都通过使用 Knative 代理被调用。
- 所有数据交换都是通过 Cloud Events 完成的。
- 工作流定义实例应从哪个点开始的灵活性。
- 使用“倾听自己”原则,以避免长时间运行的操作影响整体性能。
同时,它在部署方面也很简单,因为它依赖于单个服务和自动定义的触发器,以与 Knative 代理集成。
链接/参考
工作流作为函数流已在 Knative 社区聚会上展示,如果您有兴趣了解更多详细信息,请查看